
Back in the early days of Linux, building all of your apps from source was the norm. You’d download a tarball of source code, run a few commands like configure and make, deal with missing dependencies and libraries, and hopefully at the end of it all you’d have running software. These days, package managers like apt and yum make it much easier to install software and have largely done away with building from source, but once in a while you have no choice. I recently ran into a situation where I needed to build from source, and hence this blog on how I built NUT with modbus support on Ubuntu 22.
Long long ago, I got a UPS and wrote a post about how I monitored it with NUT. Recently, I discovered that my quite-old UPS had a bad battery, and decided that it was time to get a newer UPS that was a bit more reliable. I picked up a refurbished APC UPS for a decent price and got everything set up, including monitoring with NUT over USB. Unfortunately, the USB connection didn’t have a lot of data and was missing things like voltage. I knew that this fancy UPS should be able to monitor things like that, so I started digging into what I could do to get more information.
When I purchased the UPS I also got a network management card, and that meant I could manage it over TCP using the modbus protocol. This seemed to be the answer to my monitoring issues, but there was a catch: the apc_modbus driver was only available with NUT version 2.8 and up, and the version that apt installs on Ubuntu 22 was 7.4. I would either have to upgrade Ubuntu or manually build from source. Based on the title of this blog post, you can tell which choice I made.
Getting the source and configuring everything
Step one was to get the source code, which is available here: https://github.com/networkupstools/nut. Cloning the repo and checking out the most recent version tag got me to step one. Step two was following this guide to replacing a NUT installation. The issue was they kind of glossed over what configuration items to include, just saying “–maybe-some-other-options” in the example. Just including the single option in the example did not get me what I needed. However, earlier on there is a comment about how to find the right options:
A sound starting point would be to track down packaging recipes used by your distribution (e.g. RPM spec or DEB rules files, etc.) to detail the same paths if you intend to replace those, and copy the parameters for configure script from there — especially if your system is not currently running NUT v2.8.1 or newer (which embeds this information to facilitate in-place upgrade rebuilds).
That meant I needed to figure out how NUT is built on Ubuntu when packaged. Doing a bit of Googling led me to this page showing NUT packages in Ubuntu. I went to version 2.8.3-2, then grabbed the amd64 build. From there, the key was to go to the buildlog, because that was where I could see the actual configure options that is used in that package.
I pretty much copied over everything from that configuration command, then started experimenting with the options I needed. Based on the error messages, I would install missing dependencies like libgd-dev and try again. I decided not to create any docs because that would have required a ton of dependencies, and after messing around with trying to get nss to work instead of openssl, I just switched to the latter because despite downloading the header files, it could never find them. I also included --with-modbus for modbus support, which was the whole point of this, and as a result ended up with this configuration command:
./configure --build=x86_64-linux-gnu --prefix=/usr --includedir=\${prefix}/include --mandir=\${prefix}/share/man --infodir=\${prefix}/share/info --sysconfdir=/etc --localstatedir=/var --disable-option-checking --disable-silent-rules --libdir=\${prefix}/lib/x86_64-linux-gnu --runstatedir=/run --disable-maintainer-mode --disable-dependency-tracking --prefix=/usr --sysconfdir=/etc/nut --includedir=/usr/include --mandir=/usr/share/man --libdir=\${prefix}/lib/x86_64-linux-gnu --libexecdir=/usr/libexec --with-ssl --with-openssl --with-cgi --with-dev --enable-static --with-statepath=/run/nut --with-altpidpath=/run/nut --with-drvpath=/usr/lib/nut --with-cgipath=/usr/lib/cgi-bin/nut --with-htmlpath=/usr/share/nut/www --with-pidpath=/run/nut --datadir=/usr/share/nut --with-pkgconfig-dir=/usr/lib/x86_64-linux-gnu/pkgconfig --with-user=nut --with-group=nut --with-udev-dir=/usr/lib/udev --with-systemdsystemunitdir=/usr/lib/systemd/system --with-systemdshutdowndir=/usr/lib/systemd/system-shutdown --with-systemdtmpfilesdir=/usr/lib/tmpfiles.d --with-python=python3 --with-python3=/usr/bin/python3 --with-libsystemd --with-modbusFinally getting no errors from the configuration step, I could then make -j 4 all, and then sudo make install. After this, I had a working version of NUT that had the right driver and could move onto the next step.
Configuring NUT for modbus
After building I had a bunch of sample config files, but I needed to get them in working order to monitor things. The first file to edit was nut.conf which was very easy to set up, since all I needed to do was set up the mode as a netserver:
MODE=netserverThis would allow me to monitor the UPS status from more than one server, as opposed to a standalone setup. Since I have more than one server that will need to shut down when on battery, standalone wouldn’t work for me.
The next part was the ups.conf file which is the configuration for the UPS itself. Now that I had a supported driver, I was able to configure the following:
[apcups]
        driver = apc_modbus
        port = 192.168.X.X:502
        porttype = tcp
        desc = "APC UPS 1500"
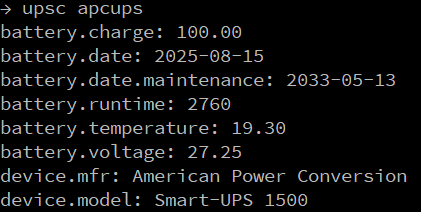
This uses modbus over TCP, and after restarting the nut-monitor service, I was able to successfully connect to the UPS and grab data with a “upsc apcups" command:
With that connection made, and the systemd services all enabled (don’t forget that step!) I was then able to get my monitoring back via Logstash, as well as set up triggers for shutting down the system if the server was on battery long enough. That will be the subject of the next post.
While this is the condensed version of my efforts and I made it seem like it was straightforward, but it was a lot of troubleshooting and dead ends. With this guide, hopefully the next person to do this will have a better journey!
1 comment