
I’ve had the Elastic stack running in my home network forever, as I’ve posted about countless times. From the start I had it running on a single server, with Elastic, Logstash, and Kibana all together. One day recently I was thinking about how I had one underpowered server running Elastic, while my file server was just sitting there doing nothing, and I came up with the idea to re-architect things.
Since my file server has the most disk space, it seemed logical to make that the Elastic data node. Kibana and Logstash I could keep on the existing server since I already had DNS entries pointing at them. The Elastic process was by far the biggest user of CPU, so getting the data node moved would mean that server with just Logstash and Kibana would no longer be underpowered. Migrating data in Elastic is pretty simple: I would stand up a new node, add it to the cluster, and through node roles and configuration settings I would mark the existing node as no longer available for data.
Adding a new node isn’t hard, but going from one node to two requires a new consideration: setting up TLS for the communicate between nodes. A single-node Elastic instance doesn’t need TLS since it’s not talking to anything else, but for security reasons once you go beyond that, you need TLS.
There are several options for doing this, and there’s even a utility, elasticsearch-certutil, that can do most of the hard work for you. I wanted to use my existing PKI and CA to create the right certs, as well as enable verification that the hostname matches the cert, known as full verification mode. And while you can use certutil to do things like generate CSRs, which would let me do it using my own PKI, I decided to do it the hard way using nothing but OpenSSL. Here’s how I did it.
First, an important point: Elastic uses TLS in two places: for HTTP traffic, and for what it calls Transport traffic. HTTP is when you connect to a node via HTTP (pretty obvious), while Transport is for internode communication. You can use the same certificate for both, but to be difficult I used separate certificates. That meant I had to do everything twice per node.
Elastic is a Java-based app, and so that means we get to use Java keystores. I played around with Java keystores with Unifi so I had some inkling of what to do, although it had been quite a while. However, it didn’t take too long to figure it out.
First, as always, I created the private keys. Since I seem to do this a lot, I realized I should save some time by having ChatGPT write a script to make this easier. This is what ChatGPT came up with:
#!/bin/bash

# Exit on error
set -e

# --- Usage check ---
if [ $# -lt 1 ]; then
          echo "Usage: $0 <common_name> [output_prefix]"
            echo "  <common_name>: The domain or entity name (e.g., example.com)"
              echo "  [output_prefix]: Optional prefix for output files (default: same as CN)"
                exit 1
fi

CN="$1"
OUT="${2:-$CN}"

KEY_FILE="${OUT}.key"
CSR_FILE="${OUT}.csr"
echo "Generating private key..."
openssl genpkey -algorithm RSA -out "$KEY_FILE" -pkeyopt rsa_keygen_bits:2048

echo "Generating CSR..."
openssl req -new -key "$KEY_FILE" -out "$CSR_FILE"

echo "✅ Done."
echo "Private Key: $KEY_FILE"
echo "CSR:         $CSR_FILE"
This script creates a private key and CSR and writes them to the appropriately-named files. Doing this four times (two nodes, Transport and HTTP certs for each) gave me four CSRs.
Now onto the signing, and I similarly used AI to create a script to make this easier:
#!/bin/bash

# Exit on error
set -e

# --- Configuration ---
INTERMEDIATE_CERT="ia.crt"
INTERMEDIATE_KEY="ia.key"
SIGNED_CERT_DIR=.
DEFAULT_DAYS=1095

# --- Usage Check ---
if [ "$#" -lt 2 ]; then
  echo "Usage: $0 <csr_file> <ext_file_values> [days_valid]"
  exit 1
fi

CSR_FILE="$1"
EXT_FILE_CONTENTS="$2"
DAYS="${3:-$DEFAULT_DAYS}"

# --- Validation ---
if [ ! -f "$CSR_FILE" ]; then
  echo "Error: CSR file '$CSR_FILE' does not exist."
  exit 1
fi

if [ ! -f "$INTERMEDIATE_CERT" ] || [ ! -f "$INTERMEDIATE_KEY" ]; then
  echo "Error: Intermediate certificate or key not found in current directory."
  exit 1
fi

# --- Output ---
CERT_NAME=$(basename "$CSR_FILE" .csr)
SIGNED_CERT="$CERT_NAME.crt"

# --- Sign the CSR ---
openssl x509 -req \
    -in "$CSR_FILE" \
    -CA "$INTERMEDIATE_CERT" \
    -CAkey "$INTERMEDIATE_KEY" \
    -out "$SIGNED_CERT" \
    -days "$DAYS" \
    -sha256 \
    -extfile <(printf "$EXT_FILE_CONTENTS")

echo "Certificate signed successfully:"
echo "→ $SIGNED_CERT"
This allowed me to easily add extension attributes to the certificate: I could run it as the following to add the appropriate subjectAltName values:
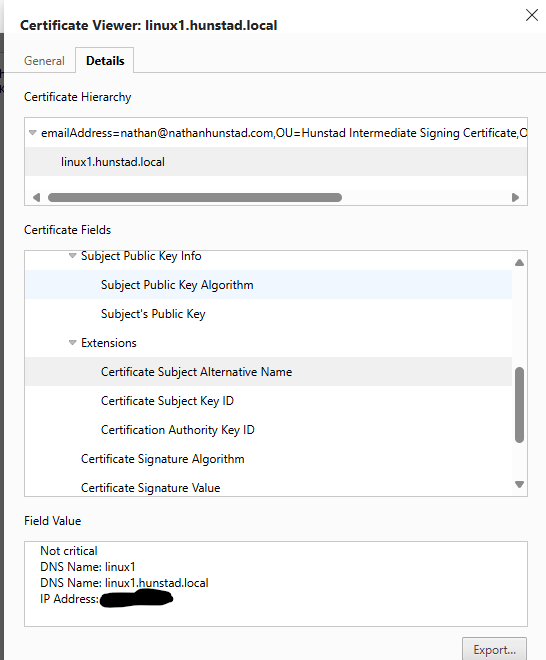
./signcsr.sh elastic-transport.linux1.key.csr "subjectAltName=DNS:linux1,DNS:linux1.hunstad.local,IP:192.168.100.1"Running that gave me my certificate with the proper signature and attributes. Next was the fun part: getting this into a Java keystore.
As before with Unifi, first I converted the CRT and KEY files into a p12 file:
openssl pkcs12 -export -in elastic-http.linux1.key.crt -inkey elastic-http.linux1.key -out elk1.http.p12 -name httpThe “name” is important: I found by playing around with certutil that for HTTP certs, the name was “http”, and for the Transport cert, the name was “instance”.
After that, I needed to add the root and intermediate certs:
keytool -import -trustcacerts -alias root -file ./root.crt -keystore elk1.http.p12 -storepass password
keytool -import -trustcacerts -alias intermediate -file ./ia.crt -keystore elk1.http.p12 -storepass password
It took a bit to figure out the right syntax, but the above code imported the root and intermediate certs to the keystore file as well.
From there, I copied the files over to /etc/elasticsearch, and that meant I could set the following configuration:
xpack.security.http.ssl:
  enabled: true
  keystore.path: elk1.http.p12

# Enable encryption and mutual authentication between cluster nodes
xpack.security.transport.ssl:
  enabled: true
  keystore.path: elk1.transport.p12
  truststore.path: elk1.transport.p12
Starting up the nodes with the proper node discovery options worked, and in the end I had a two-node cluster. Note: it’s a bad idea to have a two-node cluster where both are master-eligible. But that’s a separate discussion.
In order to move the data to the right place, I set cluster.routing.allocation.exclude._ip to the node I no longer wanted data on. After a surprisingly short time, all the data was drained. I then updated the node roles for the old node and I was done!
As proof, here is the HTTP certificate that I see when connecting to port 9200:
If you ever need to do this, now you know how.