
As part of my upgrade to Elastic 8 and modifications to Kibana, I also decided to add a TLS certificate so I could encrypt my traffic with HTTPS. Not because I’m terribly worried about some hacker listening in on my super-secret Kibana traffic, but because these days there’s no reason not to encrypt everything. In this post, I’ll walk through the steps of generating an HTTPS certificate in more than one way.
I decided to use my own PKI to do this, with a shortcut for generating the certificate: I used the elasticsearch-certuil tool in order to quickly generate a certificate signing request (CSR) that I would then sign with my intermediate certificate from my PKI hierarchy. Generating the CSR was no problem, but I added a slight twist: I wanted to add some Subject Alternate Names (SANs) to my cert so my browser would not complain. I have done this before, but this time I wanted to get extra sneaky: I wanted to add my IP as a SAN too, along with another DNS name.
Using OpenSSL CA
The method I used before was to essentially generate a configuration file on the fly, but I could not figure out how to modify the command so that I could add more than one SAN in a one-liner. I fought it for a while until I gave up and did it the way I’ve done it before: I generated a configuration file with the SANs I wanted:
####################################################################
[ ca ]
default_ca      = CA_default            # The default ca section

####################################################################
[ CA_default ]

dir             = .                     # Where everything is kept
certs           = $dir/certs            # Where the issued certs are kept
crl_dir         = $dir/crl              # Where the issued crl are kept
database        = $dir/index.txt        # database index file.
#unique_subject = no                    # Set to 'no' to allow creation of
                                        # several certs with same subject.
new_certs_dir   = $dir/newcerts         # default place for new certs.

certificate     = $dir/ia.crt   # The CA certificate
serial          = $dir/serial           # The current serial number
crlnumber       = $dir/crlnumber        # the current crl number
                                        # must be commented out to leave a V1 CRL
crl             = $dir/crl.pem          # The current CRL
private_key     = $dir/ia.key           # The private key

x509_extensions = usr_cert              # The extensions to add to the cert

# Comment out the following two lines for the "traditional"
# (and highly broken) format.
name_opt        = ca_default            # Subject Name options
cert_opt        = ca_default            # Certificate field options

# Extension copying option: use with caution.
copy_extensions = copy
...
Most of that is pretty boilerplate, but the key is in copy_extensions. When I had created the CSR using the elasticsearch-certutil tool, I had actually included the SAN extensions I wanted in the CSR using the --dns and --ip arguments. However, when you sign a CSR, by default those extensions are not carried over to the signed certificate. This is a good thing: CSRs are not necessarily trustworthy, so CAs should not accept any and all extensions in a CSR. However, I trusted me, so I wanted to copy them over. Setting copy_extensions to “copy” worked, and I got my certificate signed as I wanted using the openssl ca command.
Why not AI?
I still felt like there was a way to do what I wanted without having to set up a config file, using the one-liner from before. Since ChatGPT is all the rage now, I decided to see what it could do. Keep in mind, I did a LOT of Googling to try to find a one-liner that would let me do mutliple SANs. I’m pretty good at searching for things (it’s my superpower) and I failed. I didn’t have high hopes for ChatGPT, but isn’t this what generative AI is for?
I asked ChatGPT a simple question: “Write an OpenSSL command to add 3 SANs to a x509 certificate.” This is what it said:
To add Subject Alternative Names (SANs) to an existing X.509 certificate using OpenSSL, you need to create a new configuration file that includes the SANs you want to add, and then use the “openssl x509” command to re-sign the certificate using the new configuration file. Here is an example command:
openssl x509 -in cert_signing_request.csr -out new_cert.crt \
-req -signkey original_private_key.key \
-extfile <(echo -e "subjectAltName=DNS:www.example.com,DNS:mail.example.com,IP:192.168.0.1") \
-days 365
In this command, “original_cert.crt” is the name of the original certificate file that you want to add the SANs to, and “original_private_key.key” is the private key file that corresponds to the original certificate. The “new_cert.crt” file is the name of the output file that will contain the new certificate with the added SANs.
The “-req” option is used to tell OpenSSL that we are creating a self-signed certificate request, and the “-signkey” option specifies the private key that will be used to sign the request.
The “-extfile” option specifies the name of a file that contains the SANs to be added to the certificate. In this example, we are using a process substitution to create the file inline with the desired SANs, which include two DNS names (“www.example.com” and “mail.example.com”) and one IP address (“192.168.0.1”).
Finally, the “-days” option is used to specify the validity period of the new certificate, which is set to 365 days in this example. You can adjust this value as needed for your specific use case.
https://chat.openai.com/
This, to say the least, is impressive. And it works: just for fun I signed my CSR using this syntax, and it gave the expected result. The ChatGPT output explained everything and by sheer coincidence (I think, since reading minds is not yet a feature of LLM models) it gave me an example with 2 DNS names and one IP, which is exactly what I wanted.
The benefits and risks of generative AI tools is a book in and of itself, but this demonstrates one of the key benefits: making people more efficient by being able to quicky and accurately generate these kinds of scripts and commands to get the job done.
In the end, I got my certificate with multiple SANs for Kibana:
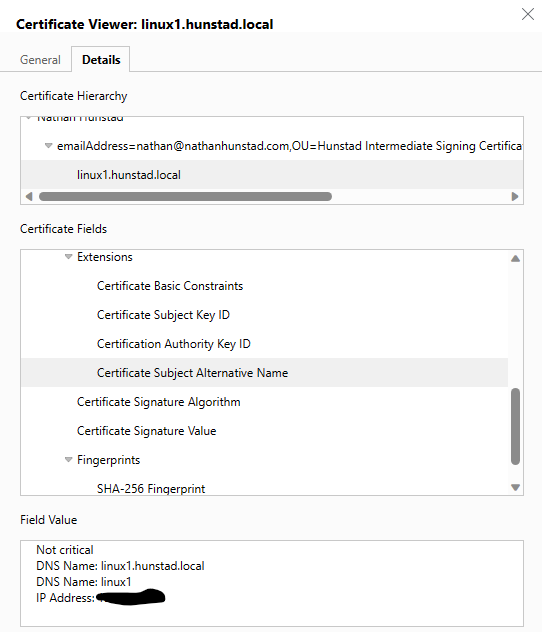
That’s all there is to it!